Networks
A network on the NNumbers Cloud platform works like a VLAN, inside which you can configure subnets.
Creating a network
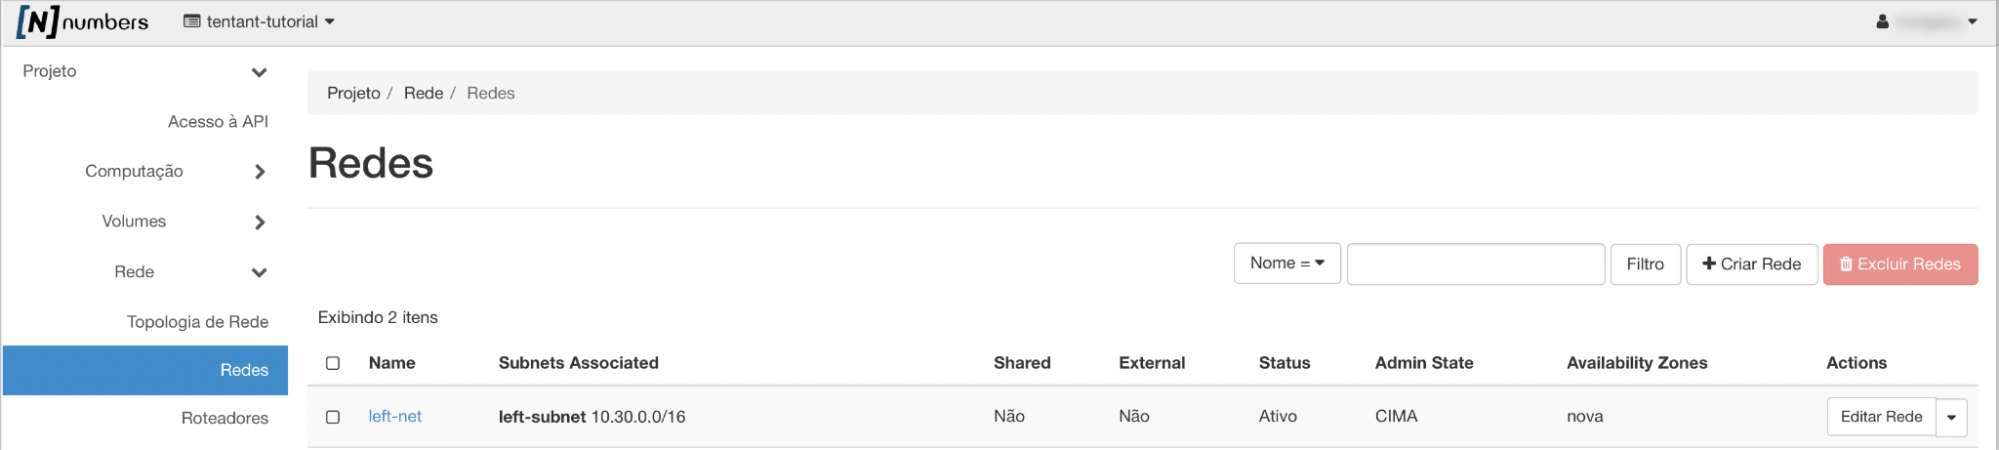
To create a network, go to Project -> Network -> Networks and click Create Network.
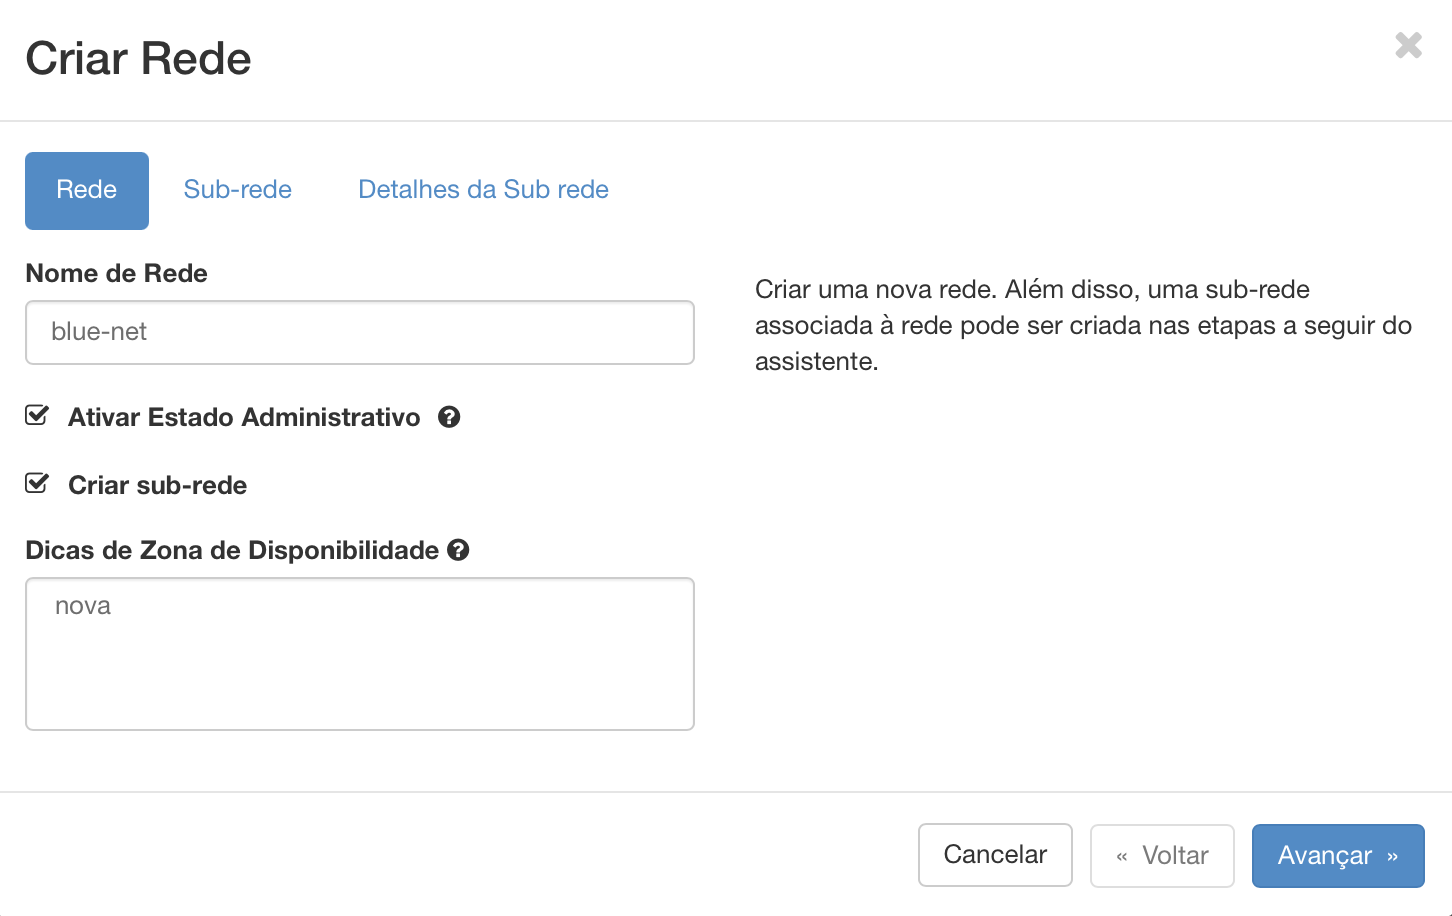
The wizard lets you create at least one subnet along with the network, together with its DHCP, DNS, and Routes settings.
If Enable Admin State is checked (the default), the network is enabled; otherwise it is not activated initially, though it can be enabled later.
The create subnet field lets you create a subnet at network creation time. You can also do it later, for additional subnets.
Availability zones where the DHCP agents can be scheduled. Leaving this unset is the same as selecting every availability zone. At the moment all DHCP agents run in a single availability zone.
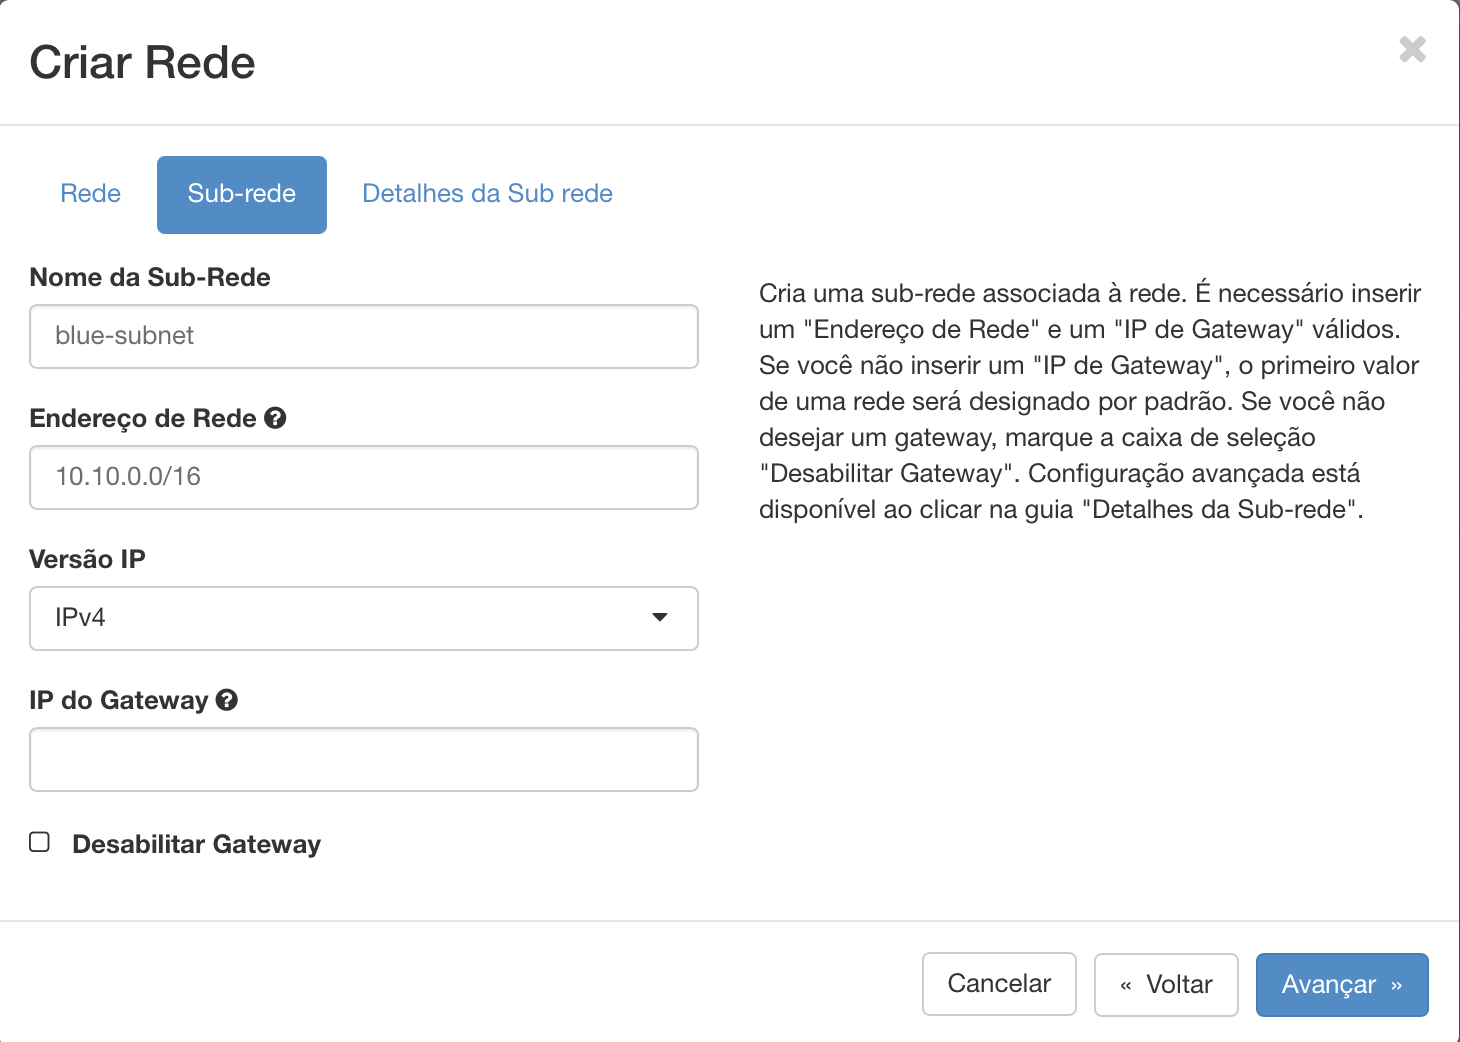
Still in the network creation wizard, the next step is creating the subnet.
You need to enter a valid "Network Address" and "Gateway IP". The network address must be in CIDR format (for example, 192.168.0.0/24, 2001:DB8::/48).
IP version: IPv4 or IPv6
Gateway IP: the gateway's IP address (for example, 192.168.0.254). The default is the first IP of the network address (for example, 192.168.0.1 for 192.168.0.0/24, 2001:DB8::1 for 2001:DB8::/48). To use the default, leave it blank. If you do not want a gateway, check Disable Gateway.
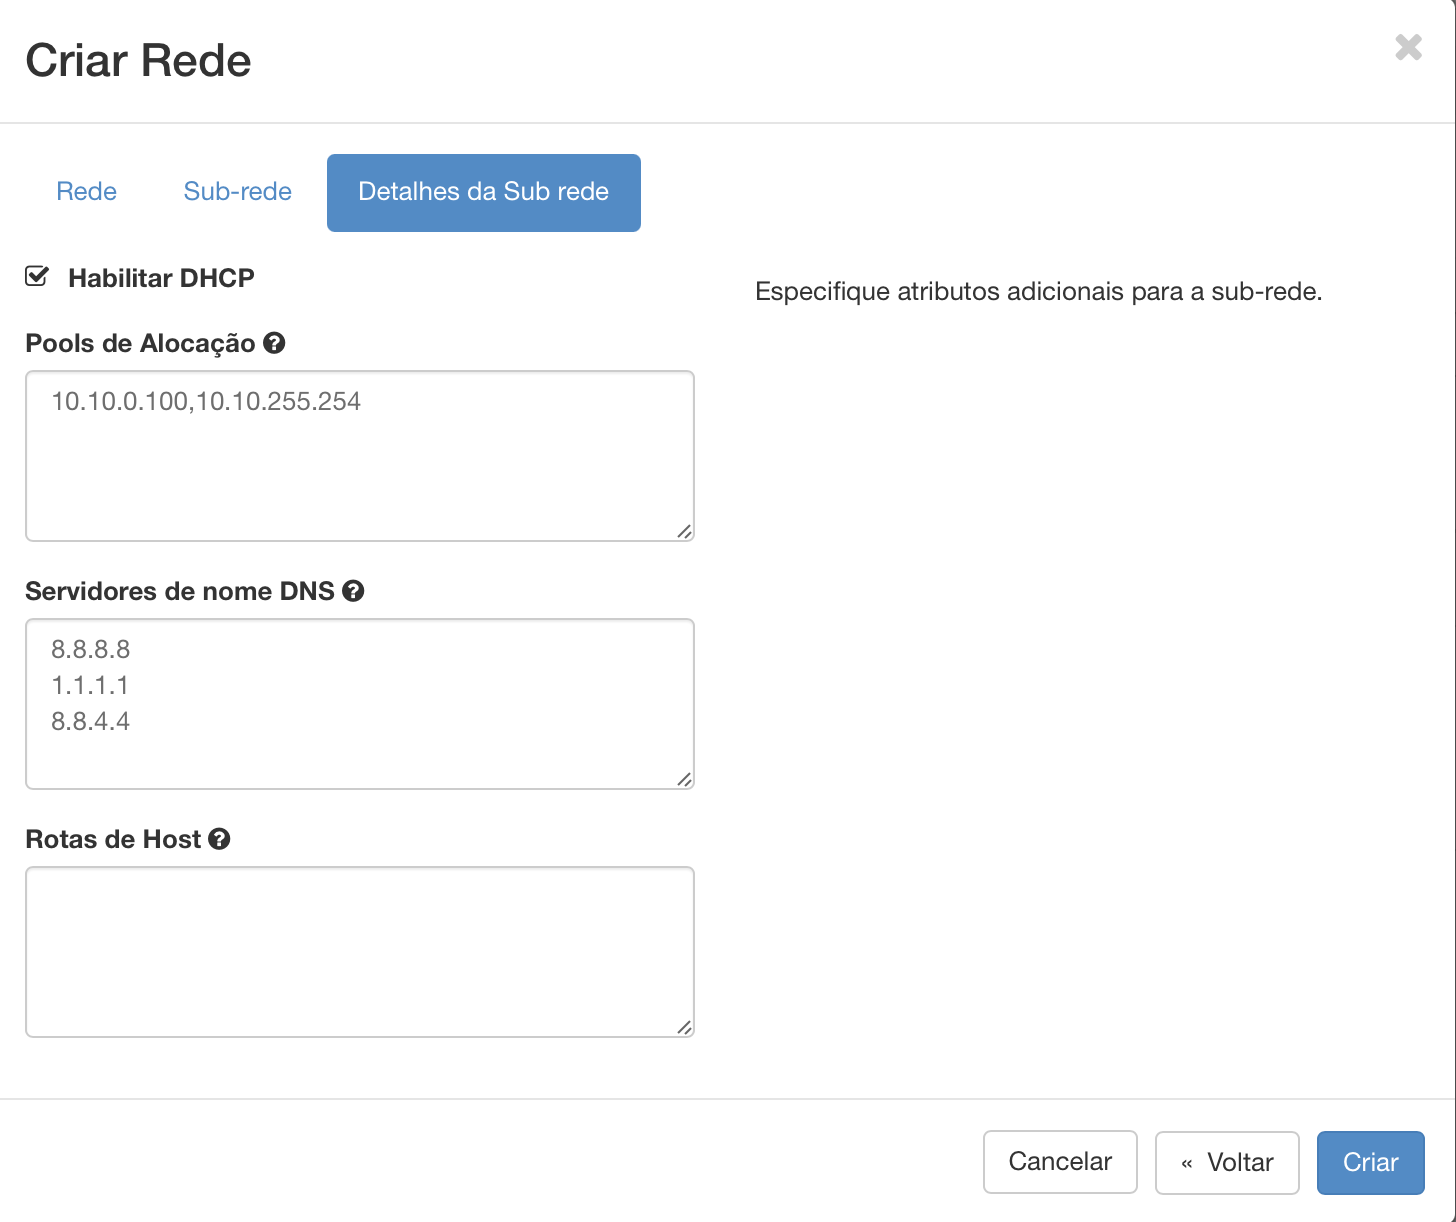
Advanced configuration (DHCP, DNS, and routes) is available under the Subnet Details tab.
Enable DHCP lets new elements on the network receive an IP automatically.
Allocation Pools are the IP ranges handed out dynamically to elements on the network that do not get static IPs. In the example, network 10.10.0.0/16 has IPs 10.10.0.2 (since the first IP, 10.10.0.1, went to the gateway) through 10.10.0.99 available for static assignment, so IPs 10.10.0.101, 10.10.0.102, and 10.10.0.103 are handed out by the DHCP agents.
DNS Name Servers is the list of DNS server IP addresses for this subnet — one per line. DNS servers are used for name resolution.
For the Host Routes field, see the section below.
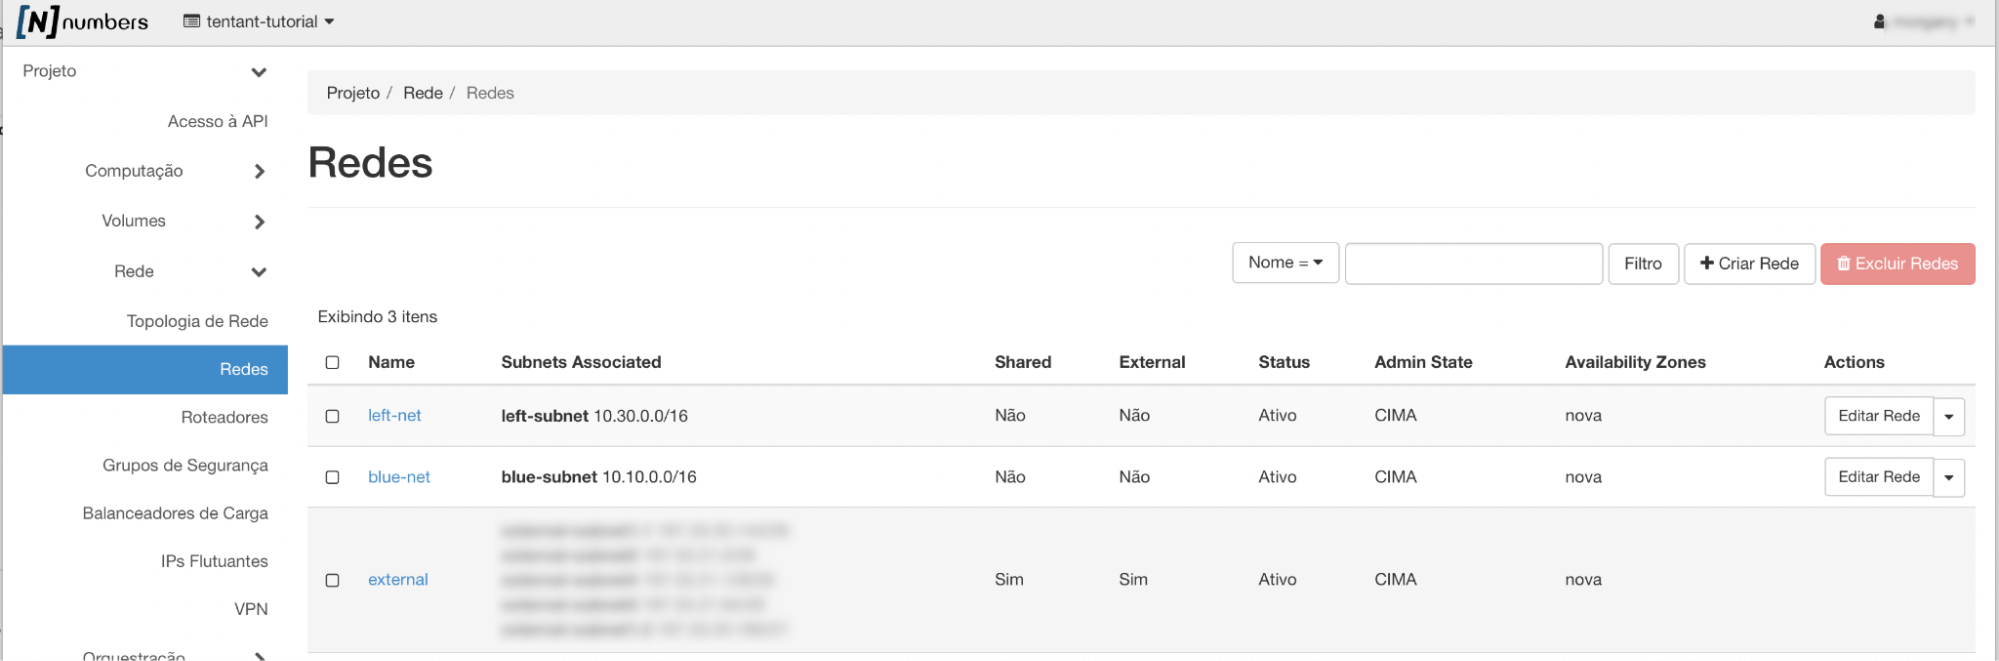
The public network external is the NNumbers Cloud network that hands out and exposes IPs directly to hosts (VM instances), floating IPs, load balancers, routers, and so on.
The External column tells you whether the network is public.
The Shared column indicates whether the network is shared across projects. A network can be shared. There is currently no way to share a network directly from the NNumbers Cloud administrative dashboard.
Editing a network
To edit a network you created, click Edit Network on the right under the Actions column, or click the network name on the left under Name and then click Edit Network
Deleting a network
To delete a network that has not been used yet, click 🔽 next to the Edit Network box and choose Delete Network, or check the (checkbox) on the left and click the red Delete Networks button. If the network has already been used, you first need to delete or detach the elements that are using it.
Subnets
A subnet is defined by a block determined by a CIDR, plus the other options already described under Create Networks.
Editing a subnet
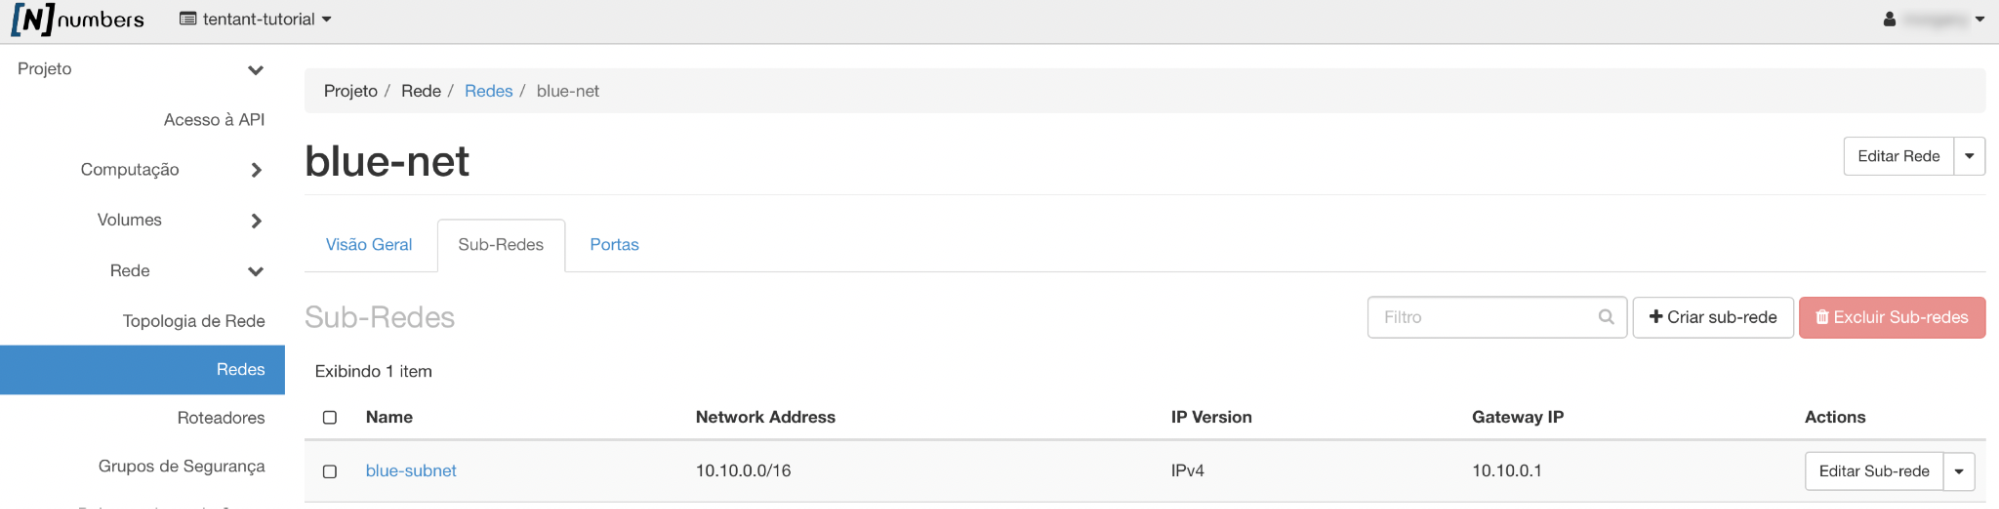
To edit a subnet, click the network name on the left under the Name column
Then click Edit Subnet.
Deleting a subnet
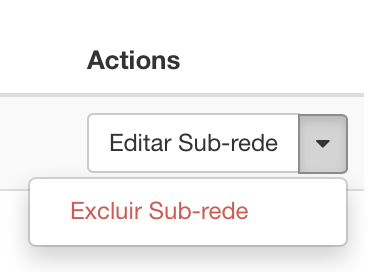
Deleting a subnet works the same way as on the previous screen (Networks) — either through the 🔽 button next to Edit Subnet, or by checking one or more subnets in the left column and clicking the red Delete Subnets button.
Create subnet lets you create subnets after the network itself. This option is more flexible, since it lets you create several subnets.
Configuring static subnet routes
Every new element on the network gets a default route whose default gateway is the resolving gateway. For optimization and to resolve route conflicts, you may need additional routes.
For route lookup performance on the host, routes are currently capped at 20. If you need more than twenty, we strongly recommend creating additional subnets with the extra routes, and additional network interfaces on the router and compute instances bound to the subnet holding those routes — that way route lookup is delegated to the interface holding the route you want.
A static route on a subnet can be configured while creating the subnet (see Subnets) or later, from Project->Network->Networks, clicking the network that contains the subnet, then the Subnet tab, then Edit Subnet.
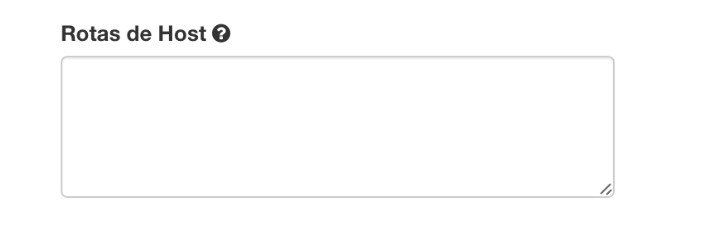
Routes can be advertised to hosts through the Host Routes field. Each entry is: destination_cidr, nexthop (for example, 192.168.200.0/24,10.56.1.254), one entry per line.
New routes are not applied to compute instances that are already running. The new routes are only picked up after the instances restart. If restarting is not an option, you can add the new routes manually on each running host.
Ports
On the NNumbers Cloud platform, the ports defined in a network's configuration act as network devices, similar to network cards.
A port can be created on a subnet and assigned to a device later, or created and assigned to an available (existing) device at creation time.
If a Linux instance changes network or IP, a network port can be created keeping the original MAC address, so the instance can pick the IP back up after a restart.
Network ports can have their own security settings (for example, a compute instance can have more than one port, each with different security groups assigned — one allowing SSH and ICMP with a restriction on which MAC addresses may connect, another allowing HTTP and HTTPS traffic).
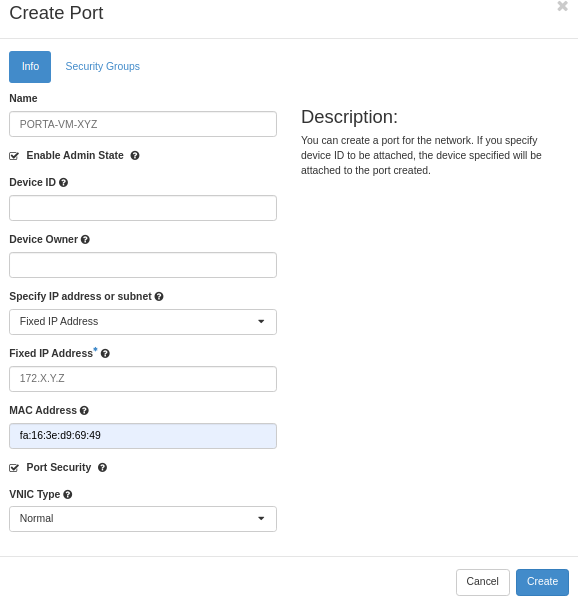
The port editing screen has the same options as the network and subnet editing screens:
Creating a port
Create Port lets you create a network port to be used later on an instance. You can predefine an IP address and the MAC address.
Editing a port
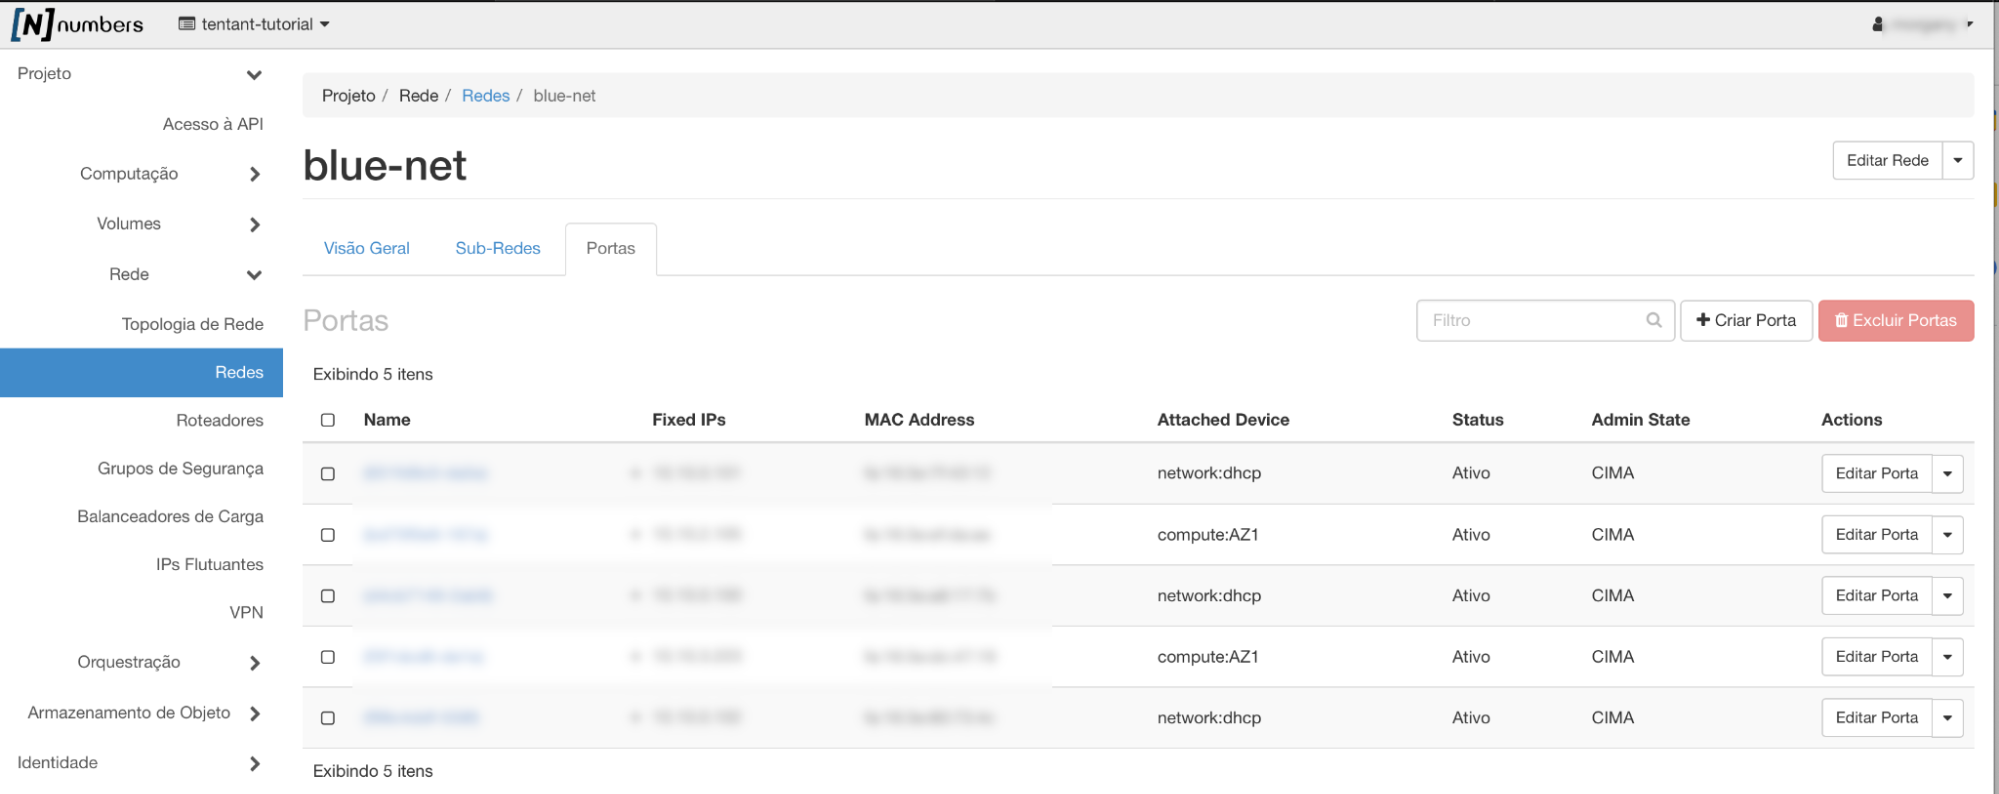
Edit Port in each row's Actions column lets you edit the port — or click the link on the left under Name and then Edit Port
Deleting a port
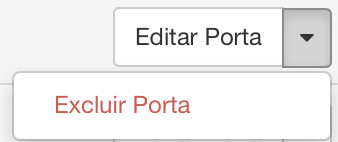
To delete a port, use either the 🔽 button next to Edit Port in the Actions column, or check the box at the left of each row and click Delete Ports.
Allowed address pairs
An allowed address pair is when you name a specific MAC address, IP address, or both, to let network traffic pass through a port regardless of the subnet. By defining allowed address pairs you can use protocols such as VRRP (Virtual Router Redundancy Protocol), which floats an IP address between two VM instances to allow fast data plane failover.
You can specify which IP (or CIDR) and MAC address pairs are allowed on a given compute device port (for example, attached device = compute:AZ1).
To add one or more allowed address pairs, click the compute device link (for example, compute:<availability-zone>) under the ports tab of the selected network:
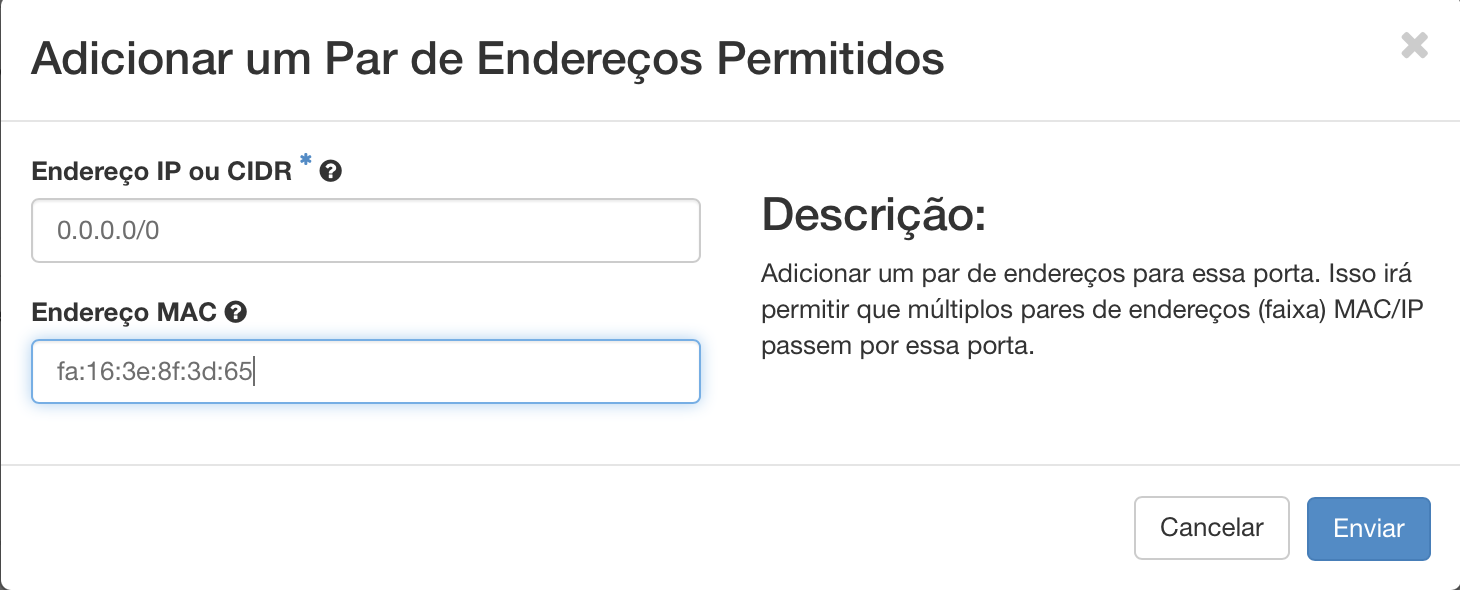
Under the Allowed Address Pairs tab, click Add Allowed Address Pair
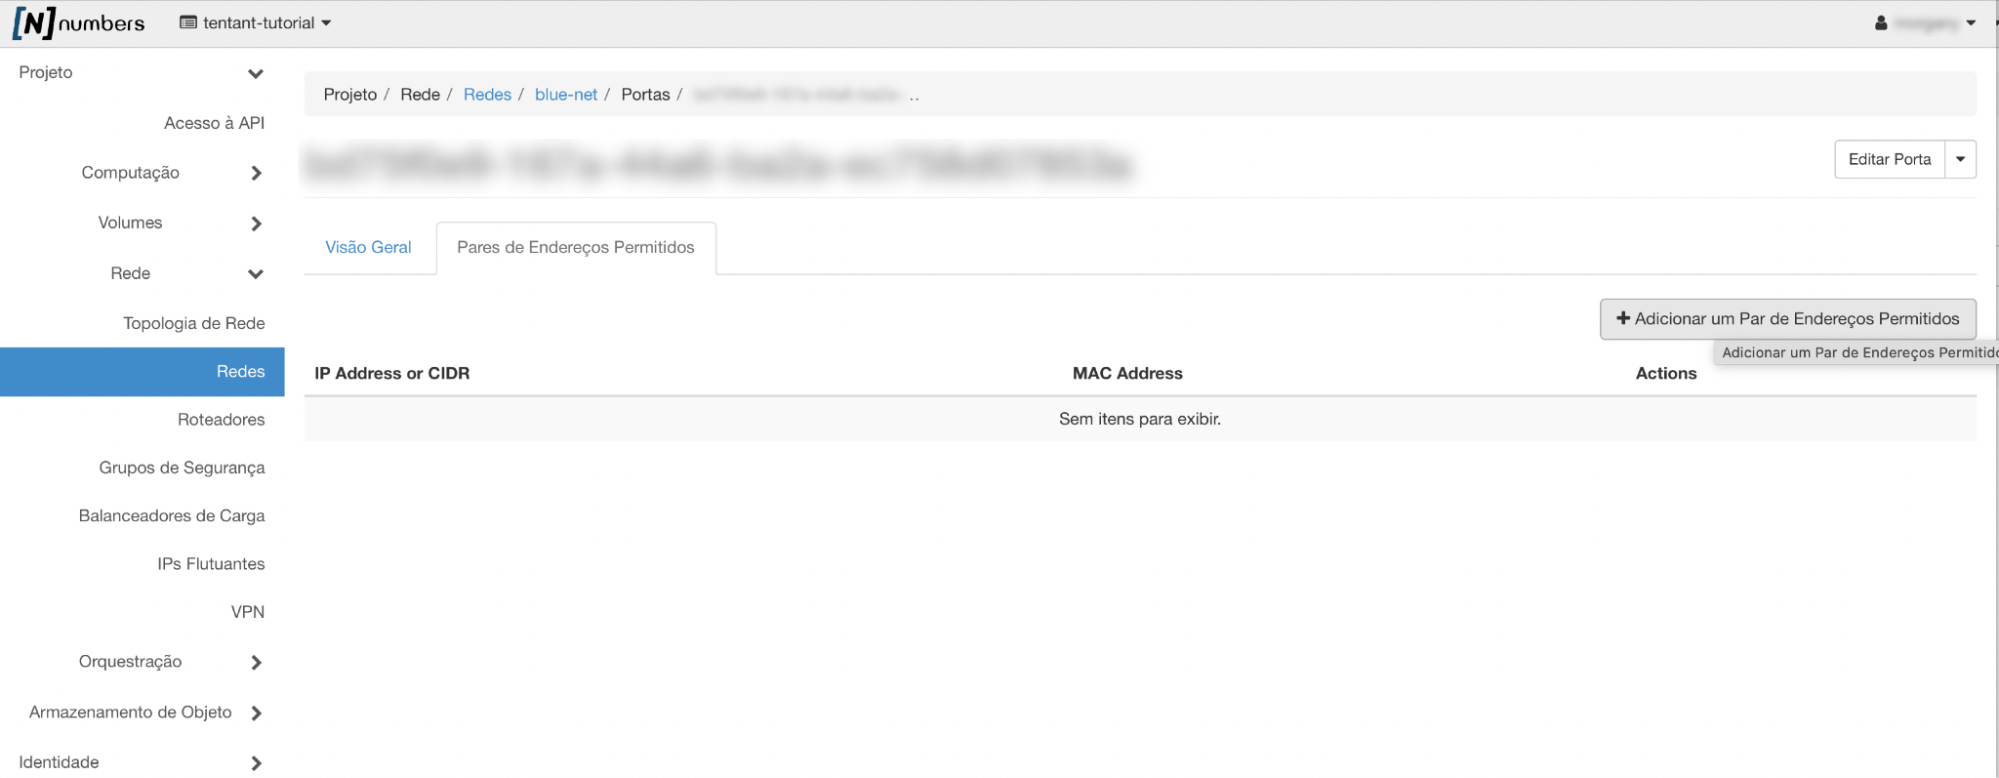
Enter the IP address or an IP range in CIDR notation.
Enter the MAC address.
Next steps
Was this page helpful?
Report a problem on this pageDo not send passwords, keys, tokens, or customer data.