Configuring external cluster access with a Kubernetes Ingress
Two kinds of ingress controller can be used with NNumbers Cloud managed Kubernetes: the platform's native ingress controller — which appears as NNumbers Cloud Ingress Controller or, in earlier console versions, One Cloud Ingress Controller — and Traefik.
Building on the Reaching the Container Infra cluster (Kubernetes) walkthrough, we configure our deployment to use the cluster's Ingress class. An ingress makes applications reachable from outside the cluster (over the web, for example).
The NNumbers Cloud native ingress configures a high-availability load balancer as a service.
NNumbers Cloud Native Ingress without TLS
The command below creates and installs an application, its service, and its ingress through an application Deployment descriptor, a Service descriptor, and an Ingress descriptor.
cat <<EOF | kubectl apply -f -
---
apiVersion: apps/v1
kind: Deployment
metadata:
  name: webserver
  namespace: default
  labels:
    app: webserver
spec:
  replicas: 3
  selector:
    matchLabels:
      app: webserver
  template:
    metadata:
      labels:
        app: webserver
    spec:
      containers:
      - name: webserver
        image: lingxiankong/alpine-test
        imagePullPolicy: IfNotPresent
        ports:
        - containerPort: 8080
---
apiVersion: v1
kind: Service
metadata:
  name: webserver
spec:
  type: NodePort
  ports:
  - name: http
    targetPort: 8080
    port: 8080
  selector:
    app: webserver
---
apiVersion: networking.k8s.io/v1
kind: Ingress
metadata:
  name: one-cloud-test-ingress-no-tls
  annotations:
    # the NNumbers Cloud native ingress controller implements the openstack standard
    kubernetes.io/ingress.class: "openstack"
    # states that it should have a floating IP visible from the internet
    octavia.ingress.kubernetes.io/internal: "false"
    # sets the floating IP to use (it must be reserved before
    # the ingress is created)
    octavia.ingress.kubernetes.io/floatingip: "<PRE-RESERVED-FLOATING-IP>"
    # states that the floating IP should be kept when the ingress is deleted
    octavia.ingress.kubernetes.io/keep-floatingip: "true"
    # comma-separated list of allowed CIDRs
    octavia.ingress.kubernetes.io/whitelist-source-range: "<COMMA-SEPARATED-CIDR-LIST>"
    # listener timeout settings
    octavia.ingress.kubernetes.io/timeout-client-data: "60000"
    octavia.ingress.kubernetes.io/timeout-member-connect: "6000"
    octavia.ingress.kubernetes.io/timeout-member-data: "60000"
    octavia.ingress.kubernetes.io/timeout-tcp-inspect: "300000"
spec:
  className: "openstack"
  rules:
  ### the site address exposing the application
  - host: app.mysite.com
    http:
      paths:
      ### if you want to reach: mysite.com/ping
      - path: /ping
        pathType: Exact
        backend:
          service:
            name: webserver
            port:
              number: 8080
EOF
Check that port 8080 of the POD was exposed:
kubectl get svc
Output:
NAME         TYPE        CLUSTER-IP       EXTERNAL-IP   PORT(S)          AGE

webserver    NodePort    10.254.60.247   <none>        8080:31770/TCP    9s
Notes:
The
kubernetes.io/ingress.classannotation with the valueopenstackis required to use the NNumbers Cloud Native Ingress, which follows the OpenStack API standards — in this case the load balancing API, called Octavia.The
octavia.ingress.kubernetes.io/internalannotation exposes the application to the web (valuefalse) or only to the internal network (valuetrue)
Once the value is set to true and a floating IP is assigned, setting it back to false does not automatically remove the floating IP from the load balancer.
The
octavia.ingress.kubernetes.io/floatingipannotation lets you supply a pre-allocated IP. For it to work,octavia.ingress.kubernetes.io/internalmust be set tofalse.The
octavia.ingress.kubernetes.io/keep-floatingipannotation keeps the floating IP after the ingress is deleted. For it to work,octavia.ingress.kubernetes.io/internalmust be set tofalse.The
octavia.ingress.kubernetes.io/whitelist-source-rangeannotation lets you list the CIDRs allowed to reach the ingress IPs, and is optional.The
octavia.ingress.kubernetes.io/timeout-client-dataannotation sets the client inactivity timeout in milliseconds. The default is 50000.The
octavia.ingress.kubernetes.io/timeout-tcp-inspectannotation sets how long to wait for additional TCP packets for content inspection, in milliseconds. The default is 0.The
octavia.ingress.kubernetes.io/timeout-member-connectannotation sets the pool member backend connection timeout in milliseconds. The default is 5000.The
octavia.ingress.kubernetes.io/timeout-member-dataannotation sets the pool member backend inactivity timeout in milliseconds. The default is 50000.
.spec.rules[].host(app.mysite.com) is the address the service is exposed on. Opening that address should open the application.
.spec.rules[].http.paths[].path(/ping) is the final path to reach the application, giving:app.mysite.com/pingThe
octavia.ingress.kubernetes.io/whitelist-source-rangeannotation configures the allowed CIDR(s) on the load balancer listener (when using the platform's native ingress controller).
Wait a moment and check that the ingress was created:
kubectl get ingress -n default
Output:
NAME                   CLASS    HOSTS          ADDRESS         PORTS   AGE

test-ingress           <none>   app.mysite.com   187.33.21.143   80      8m35s
If everything went well, you see an IP address. That IP can be used in the domain's DNS to expose the application on the web — for example, app.mysite.com
Our test application is already configured in the deployment descriptor with 3 replicas, but you can raise or lower that number by scaling horizontally (pods can also be scaled vertically, by raising CPU/vCPU and RAM; to demonstrate ingress and load balancing we focus on horizontal scaling) out or in, through the Deployment descriptor, through HPA (Horizontal Pod Autoscaler), or with:
kubectl scale deployment webserver -n default --replicas=<number-of-replicas>
To check how many replicas of the application pod exist:
kubectl get pods -n default
Output:
AME                         READY   STATUS    RESTARTS   AGE
webserver-69b47b55f5-qmztl   1/1     Running   0          10s
webserver-69b47b55f5-xrjlx   1/1     Running   0          29m
webserver-69b47b55f5-z4cwl   1/1     Running   0          10s
To test the application's load balancing, the code below makes several requests to the application; the result should be the pod name (from the list above):
for _ in $(seq 1 8); do
  curl -H "Host: app.mysite.com" \
       http://$(kubectl get ing one-cloud-test-ingress-no-tls -o jsonpath='{.status.loadBalancer.ingress[].ip}')/ping;
done;
Example output:
webserver-69b47b55f5-xrjlx
webserver-69b47b55f5-z4cwl
webserver-69b47b55f5-xrjlx
webserver-69b47b55f5-qmztl
webserver-69b47b55f5-z4cwl
webserver-69b47b55f5-qmztl
webserver-69b47b55f5-z4cwl
webserver-69b47b55f5-xrjlx
NNumbers Cloud Native Ingress with TLS
To show which artifacts are needed and how to configure Ingress with TLS, we generate self-signed certificates. The commands below create a file named gen_certs.sh and then generate the certificate authority (CA) certificate — used later for testing — plus a self-signed certificate and its key, both used in this walkthrough and the next one (TLS+SNI):
cat <<EOF> gen_certs.sh
#!/bin/sh

if [ "\$1" == "" ]; then
  DEFAULT_DOMAIN="www.example.com"
  read -p "Enter your server domain [\$DEFAULT_DOMAIN]: " DOMAIN
  DOMAIN="\${DOMAIN:-\$DEFAULT_DOMAIN}"
else
  DOMAIN=\$1
fi

echo \$DOMAIN
echo "Please enter your private key password: "
read -sr KEY_PASS

if [ ! -f ca.crt ]; then
  echo "Create CA cert(self-signed) and key..."
  CA_SUBJECT='/C=BR/ST=Sao Paulo/L=Sao Paulo/O=Nnumbers/OU=Cloud/CN=CA'
  openssl req -new -x509 -nodes -days 3650 -newkey rsa:2048 \
    -keyout ca.key -out ca.crt -subj "\$CA_SUBJECT" >/dev/null 2>&1
fi

echo "Create server key..."
openssl genrsa -des3 -out \${DOMAIN}-encrypted.key -passout pass:\${KEY_PASS} 2048 >/dev/null 2>&1
echo "Remove password..."
openssl rsa -in \${DOMAIN}-encrypted.key \
  -traditional -out \${DOMAIN}.key -passin pass:\${KEY_PASS} \
  -passout 'pass:' >/dev/null 2>&1

echo "Create server certificate signing request..."
SUBJECT='/C=BR/ST=Sao Paulo/L=Sao Paulo/O=Nnumbers/OU=Cloud/CN='\$DOMAIN
openssl req -new -nodes -subj "\$SUBJECT" \
  -key \$DOMAIN.key \
  -out \$DOMAIN.csr >/dev/null 2>&1

echo "Sign SSL certificate..."
openssl x509 -req -days 3650 -in \$DOMAIN.csr -CA ca.crt -CAkey ca.key \
  -set_serial 01 -out \$DOMAIN.crt >/dev/null 2>&1

echo "Succeed!"
EOF


chmod +x gen_certs.sh

./gen_certs.sh
Enter your server domain [www.example.com]: app.mysite.com
Create CA cert(self-signed) and key...
Create server key...
Enter PEM pass phrase:  <TYPE-ANY-PASSWORD> (e.g. 12345)
Verifying - Enter PEM pass phrase: <REPEAT-THE-PASSWORD>
Remove password...
Enter pass phrase for app.mysite.com-encrypted.key: <REPEAT-THE-PASSWORD>
Create server certificate signing request...
Sign SSL certificate...
Succeed!

ls

app.mysite.com-encrypted.key  app.mysite.com.crt  app.mysite.com.csr  app.mysite.com.key  ca.crt  ca.key  gen_certs.sh


./gen_certs.sh
Enter your server domain [www.example.com]: app.yoursite.com
Create CA cert(self-signed) and key...
Create server key...
Enter PEM pass phrase:  <TYPE-ANY-PASSWORD> (e.g. 12345)
Verifying - Enter PEM pass phrase: <REPEAT-THE-PASSWORD>
Remove password...
Enter pass phrase for app.mysite.com-encrypted.key: <REPEAT-THE-PASSWORD>
Create server certificate signing request...
Sign SSL certificate...
Succeed!

ls

app.mysite.com-encrypted.key  app.mysite.com.crt  app.mysite.com.csr  app.mysite.com.key  app.yoursite.com-encrypted.key  app.yoursite.com.crt  app.yoursite.com.csr  app.yoursite.com.key  ca.crt  ca.key  gen_certs.sh
For the cloud load balancer to accept the certificate, it must be within its validity period and be at least 2048 bits
Assuming you have the certificate (.crt) and key (.key) files with no password, create the Kubernetes secret holding the certificate and key:
kubectl create secret tls my-tls-secret \
  --cert app.mysite.com.crt \
  --key app.mysite.com.key
Then create the file below with the ingress configuration, the backend, and the default service for not-found requests and health checks:
cat > tls.yaml << EOF
---
apiVersion: apps/v1
kind: Deployment
metadata:
  name: default-http-backend
  labels:
    app: default-http-backend
    version: "v1"
  namespace: default
spec:
  replicas: 1
  selector:
    matchLabels:
      app: default-http-backend
  template:
    metadata:
      labels:
        app: default-http-backend
    spec:
      containers:
      - name: default-http-backend
        # Any image works, as long as it:
        # 1. Serves a 404 page at /
        # 2. Serves a 200 page at the /healthz endpoint
        image: registry.k8s.io/defaultbackend-amd64:1.5
        ports:
        - containerPort: 8080
---
apiVersion: v1
kind: Service
metadata:
  name: default-http-backend
  namespace: default
  labels:
    app: default-http-backend
spec:
  type: NodePort
  ports:
  - port: 80
    targetPort: 8080
  selector:
    app: default-http-backend
---
apiVersion: networking.k8s.io/v1
kind: Ingress
metadata:
  name: one-cloud-test-ingress-tls
  annotations:
    # the NNumbers Cloud native ingress controller implements the openstack standard
    kubernetes.io/ingress.class: "openstack"
    # states that it should have a floating IP visible from the internet
    octavia.ingress.kubernetes.io/internal: "false"
spec:
  defaultBackend:
    service:
      name: default-http-backend
      port:
        number: 80
  tls:
  - secretName: my-tls-secret
    hosts:
    - app.mysite.com
  rules:
  - host: app.mysite.com
    http:
      paths:
      - path: /ping
        pathType: Exact
        backend:
          service:
            name: webserver
            port:
              number: 8080
EOF
Finally, deploy the backend, service, and ingress:
kubectl apply -f tls.yaml
You can follow the ingress rollout by watching the events and/or the ingress controller pod's log in the kube-system namespace
kubectl get event -w
#
kubectl logs -v=5 -f -n openstack-system -l \
  app.kubernetes.io/name=octavia-ingress-controller
Once the rollout finishes, you can test. The command below gets the load balancer's floating IP and stores it in the FLOATING_IP environment variable for the tests that follow:
FLOATING_IP=$(kubectl get ing one-cloud-test-ingress-tls -o jsonpath="{.status.loadBalancer.ingress[0].ip}" )
Run the tests below and check the results:
kubectl get pod
Output:
NAME                                    READY   STATUS    RESTARTS   AGE
default-http-backend-5b77d4454d-kfgps   1/1     Running   0          17h
webserver-5c74674fb8-kr8zf              1/1     Running   0          9d
webserver-5c74674fb8-m4wlt              1/1     Running   0          9d
webserver-5c74674fb8-vzfmh              1/1     Running   0          9d
curl --cacert certs/ca.crt \
 --resolve app.mysite.com:443:${FLOATING_IP} \
 https://app.mysite.com/ping && echo
Output:
webserver-5c74674fb8-vzfmh
curl --cacert ~/ingress/certs/ca.crt \
 --resolve app.mysite.com:443:${FLOATING_IP}  \
 https://app.mysite.com && echo
Output:
default backend - 404
curl --cacert ~/ingress/certs/ca.crt \
 --resolve app.mysite.com:443:${FLOATING_IP} \
 https://app.mysite.com/healthz && echo
Output:
ok
NNumbers Cloud Native Ingress with TLS and the SNI extension[\6]
For host-specific certificates, create a new secret for the new certificate in the Kubernetes cluster:
kubectl create secret tls your-tls-secret \
  --cert app.yoursite.com.crt \
  --key app.yoursite.com.key
Edit the ingress configuration file you created earlier and add the highlighted settings:
vi tls.yaml
---
. . .
---
apiVersion: networking.k8s.io/v1
kind: Ingress
metadata:
  name: one-cloud-test-ingress-tls
  annotations:
    # the NNumbers Cloud ingress controller implements the openstack standard
    kubernetes.io/ingress.class: "openstack"
    # states that it should have a floating IP visible from the internet
    octavia.ingress.kubernetes.io/internal: "false"
spec:
  defaultBackend:
    service:
      name: default-http-backend
      port:
        number: 80
  tls:
  - secretName: my-tls-secret
    hosts:
    - app.mysite.com
  - secretName: your-tls-secret
    hosts:
    - app.yoursite.com
  rules:
  - host: app.mysite.com
    http:
      paths:
      - path: /ping
        pathType: Exact
        backend:
          service:
            name: webserver
            port:
              number: 8080
  - host: app.yoursite.com
    http:
      paths:
      - path: /ping
        pathType: Exact
        backend:
          service:
            name: webserver
            port:
              number: 8080
To roll out the ingress changes, run:
kubectl apply -f tls.yaml
To test the changes above, copy and run:
for h in my your; do
  for _ in $(seq 1 2); do
    curl --cacert ~/ingress/certs/ca.crt \
      --resolve app.${h}site.com:443:${FLOATING_IP} \
      https://app.${h}site.com/ping;
  done;
done;
The code above should return something like:
webserver-5c74674fb8-kr8zf
webserver-5c74674fb8-m4wlt
webserver-5c74674fb8-vzfmh
webserver-5c74674fb8-m4wlt
Reaching the Kubernetes Dashboard
When creating the cluster you can request the installation of kubernetes-dashboard by selecting the appropriate add-on software. It can also be installed other ways, such as through helm. Installing kubernetes-dashboard by means other than NNumbers Cloud's own tooling (administrative console, API, and CLI) may enable it in a different namespace, so the access URL will differ from the one shown here. This walkthrough focuses on the installation performed by NNumbers Cloud tooling during cluster creation.
Once the cluster is created with kubernetes-dashboard enabled, follow these steps:
- Create the file dashboard-adminuser.yaml with this content:
apiVersion: v1
kind: ServiceAccount
metadata:
  name: admin-user
  namespace: kubernetes-dashboard

---
apiVersion: rbac.authorization.k8s.io/v1
kind: ClusterRoleBinding
metadata:
  name: admin-user
roleRef:
  apiGroup: rbac.authorization.k8s.io
  kind: ClusterRole
  name: cluster-admin
subjects:
- kind: ServiceAccount
  name: admin-user
  namespace: kubernetes-dashboard
- Run the following command to create the service account and cluster role binding defined above
kubectl -n kube-dashboard apply -f dashboard-adminuser.yaml
- Create the access token for the admin user
kubectl -n kube-system create token admin-user
- Start the Kubernetes proxy
kubectl -n kubernetes-dashboard port-forward svc/kubernetes-dashboard 8443:443
-
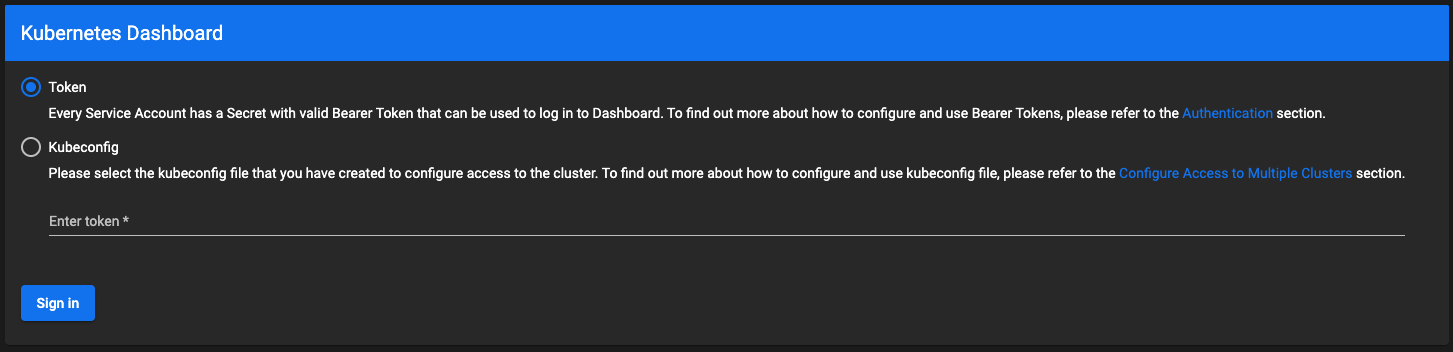
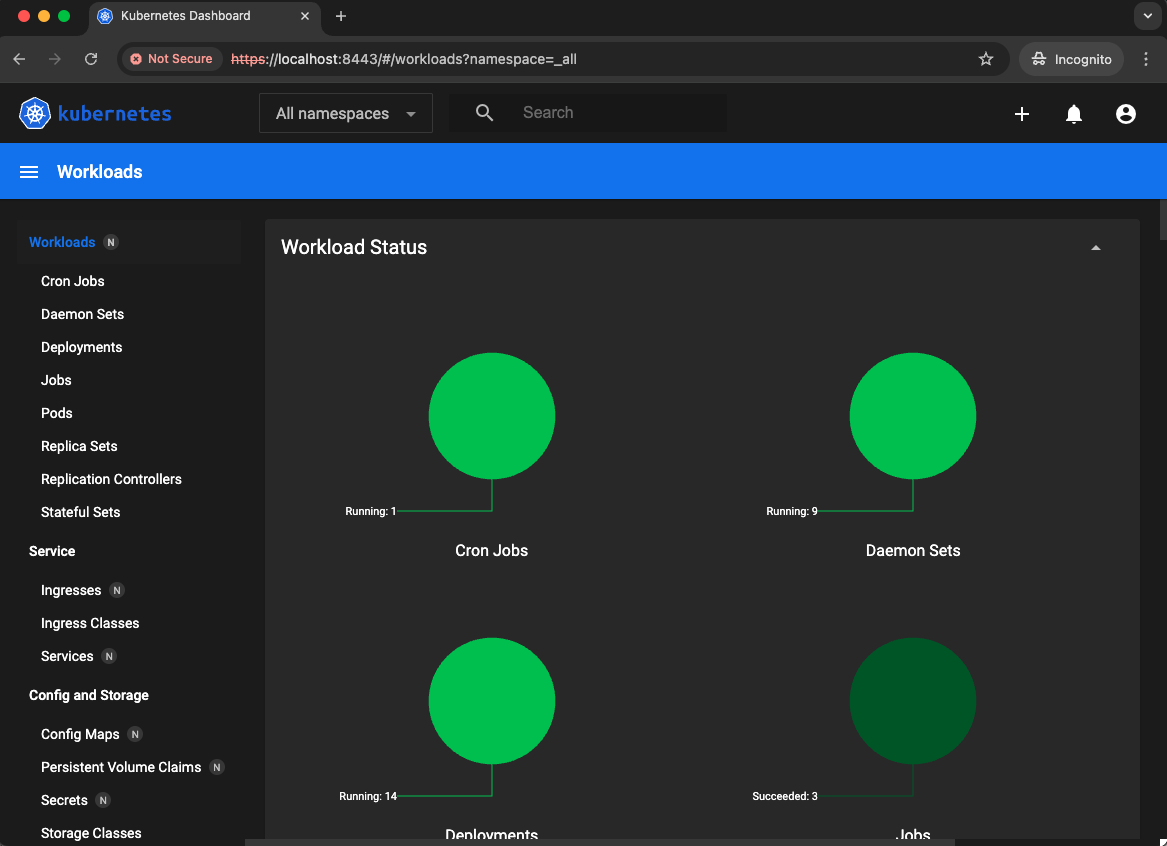
Open the browser at the URL and supply the token you obtained:
https://localhost:8443 -
Use the generated token to log in:
Reaching the monitoring dashboard
When creating the cluster you can request the installation of the monitoring tools (Grafana, Alertmanager, Loki, and Prometheus) by selecting the appropriate add-on software. They can also be installed other ways, such as through helm. Installing the monitoring tools by means other than NNumbers Cloud's own tooling (administrative console, API, and CLI) may enable them in a different namespace, so the access URL will differ from the one shown here. This walkthrough focuses on the installation performed by NNumbers Cloud tooling during cluster creation.
Once the cluster is created with that option enabled, follow these steps:
- Get the admin user's password
kubectl get secret -n monitoring-system kube-prometheus-stack-grafana -o jsonpath="{.data.admin-password}" |base64 -d
- Run port-forward to reach the dashboard.
kubectl port-forward --namespace monitoring-system service/kube-prometheus-stack-grafana 3000:80
-
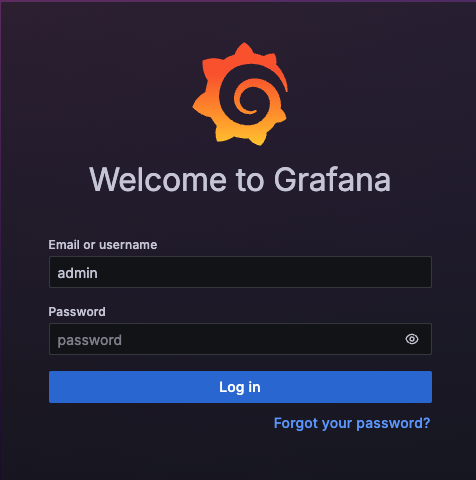
Open the browser at:
http://localhost:3000/ -
Log in with the admin user and the password you retrieved
Resizing the cluster
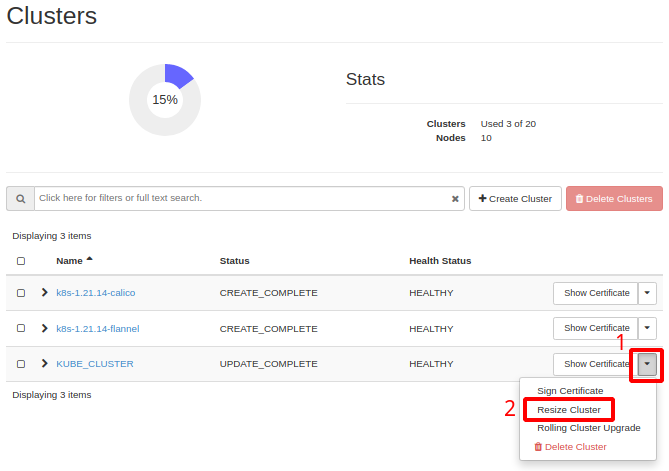
Even if Auto Scaling was selected at creation time, you can set the cluster size statically. Open the cluster list (Managing Kubernetes clusters), find the cluster, click the down "arrow" on the right (item 1), and then "Resize Cluster" (item 2).
In the window that opens, enter the cluster size (item 1). Then click "Submit" at the bottom (item 2)

The cluster is resized to the size you set.
Applications deployed on the cluster earlier may stop working correctly if they allocate more resources (CPU, memory, and storage) than the cluster's new size provides (many applications / little compute).
Upgrading the Kubernetes cluster
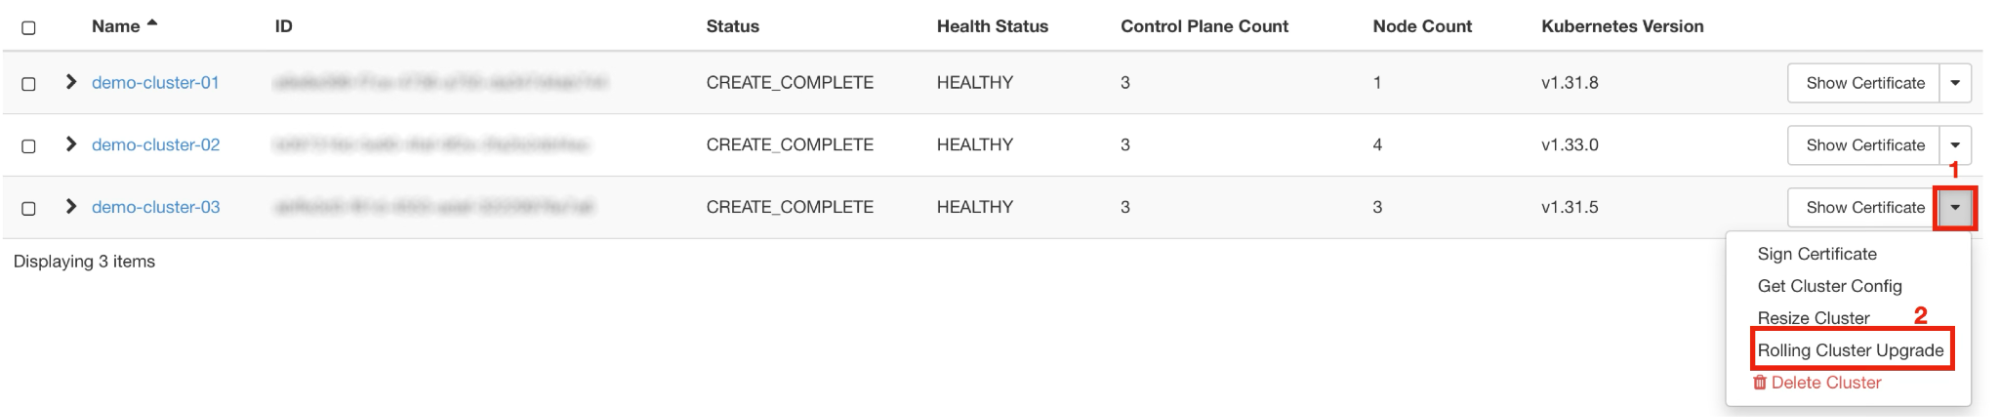
To upgrade the cluster, open the menu (1) and click Rolling Cluster Upgrade (2).
Before upgrading a production cluster, we recommend doing it first in a non-production environment, since some of your applications may not behave as expected — or may stop working.
Note that a cluster can only be upgraded by one minor version and by patch
(for example v1.31.1 -> v1.32.5, v1.31.1 -> v1.31.2), never by more than one minor version (for example v1.31.1 -> v1.33.2).
Keep your cluster up to date: the supported versions are only the latest minor version[\7] released by NNumbers (N) back to that latest minor version minus 3 (N-3).
Then, under New Cluster Template, select the version you want and click Submit.
Only versions above the Kubernetes cluster's current version should be offered for selection.
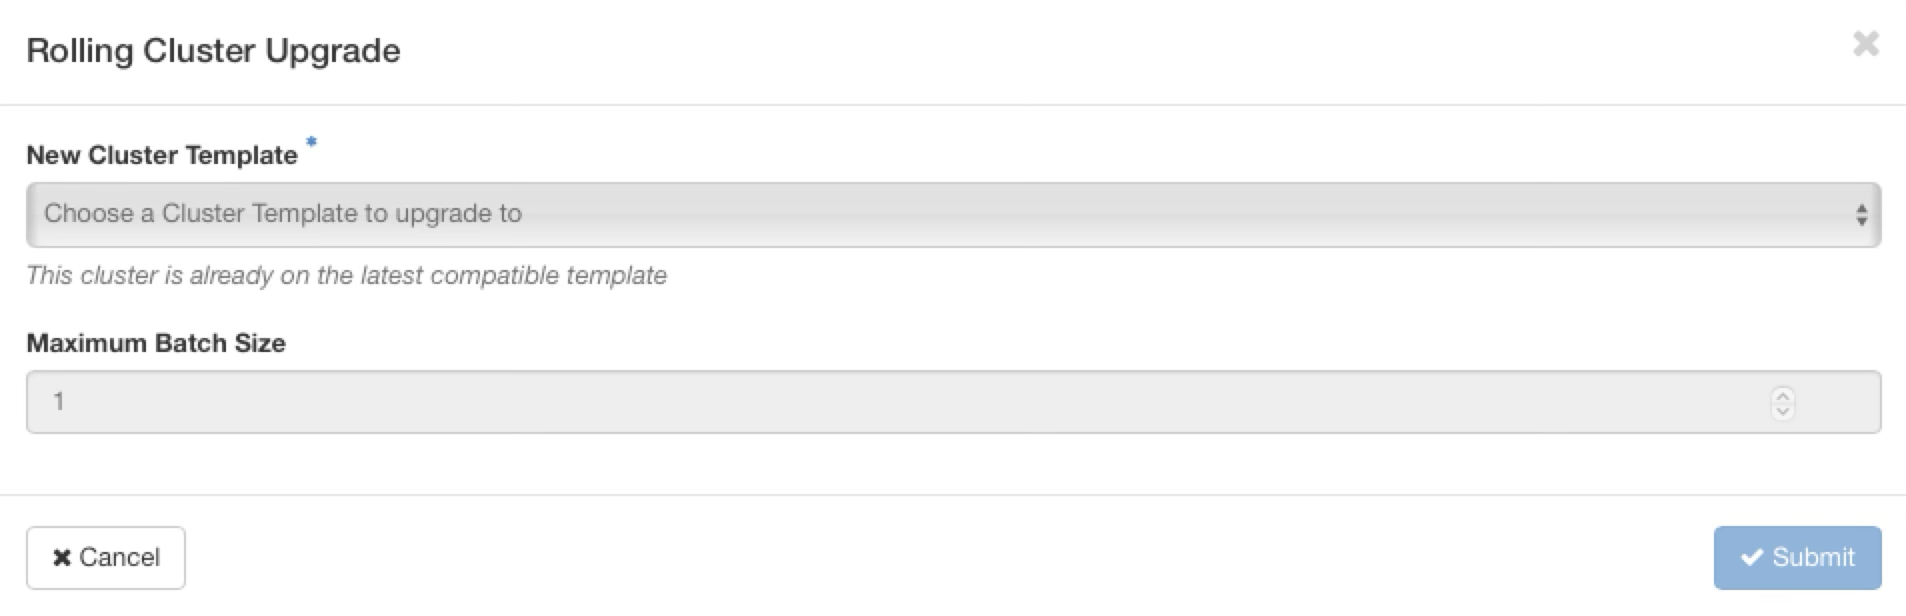
The upgrade can take several minutes to complete, depending on your cluster's size and the applications configured on it.
Next steps
Was this page helpful?
Report a problem on this pageDo not send passwords, keys, tokens, or customer data.